Everything you need to know about Multi-Cloud Clusters on MongoDB Atlas

👋 Kumusta! I'm a Filipina software engineer, speaker, published author of the book Coding for Kids: Python, and a LinkedIn Learning instructor who specializes in Cloud Development courses.
Currently, I'm also a Senior Developer Advocate for Cisco where I'm sharing how we're so much more than a network and infrastructure company!
Perhaps most important, however, is that I spend way too much money on desserts and ungodly amounts of time playing Cyberpunk 2077!
Bonus Fun Facts: 🕹 Favorite PC/video games: Age of Empires II, RollerCoaster Tycoon 2, and the Borderlands series 💄 Favorite lipstick color is Bite's Aubergine 🎬 Favorite movies are Inception (really, anything be Christopher Nolan) and The Matrix.
Multi-cloud clusters on MongoDB Atlas are now generally available! Just as you might distribute your data across various regions, you can now distribute across multiple cloud providers as well. This gives you a lot more freedom and flexibility to run your application anywhere and move across any cloud without changing a single line of code.
Want to use Azure DevOps for continuous integration and continuous deployment but Google Cloud for Vision AI? Possible! Need higher availability in Canada but only have a single region available in your current cloud provider? Add additional nodes from another Canadian region on a different cloud provider! These kinds of scenarios are what multi-cloud was made for!

In this post, I won't be telling you why multi-cloud is useful; there are several articles (like this one or that one) and a Twitch stream that do a great job of that already! Rather, in this post, I'd like to:
- Show you how to set up a multi-cloud cluster in MongoDB Atlas.
- Explain what each of the new multi-cloud options means.
- Acknowledge some new considerations that come with multi-cloud capabilities.
- Answer some common questions surrounding multi-cloud clusters.
Let's get started!
Requirements
To go through this tutorial, be sure to have the following:
- A MongoDB Cloud Account
- To create an M10 cluster or higher (note that this isn't covered by the free tier)
Quick Jump
- How to Set up a Multi-Cloud Cluster
- How to Test a Primary Node Failover to a Different Cloud Provider
- Differences Between Electable, Read-Only, and Analytics Nodes
- Choosing Your Electable Node Distribution
- Multi-Cloud Considerations
- Multi-Cloud FAQs
How to Set Up a Multi-Cloud Cluster
Log into your MongoDB Cloud account.
Select the organization and project you wish to create a multi-cloud cluster in. If you don't have either, first create an organization and project before proceeding.
Click "Build a Cluster". (Alternatively, click "Create a New Cluster" toward the top-right of the screen, visible if you have at least one other cluster.)
If this is the first cluster in your project, you'll be asked to choose what kind of cluster you'd like to create. Select "Create a cluster" for the "Dedicated Multi-Region Clusters" option.
You are brought to the "Create a Multi-Region Cluster" screen. If not already in the ON position, toggle the "Multi-Cloud, Multi-Region & Workload Isolation" option:

This will expand several more options for you to configure. These options determine the type and distribution of nodes in your cluster:
💡 What's the difference between "Multi-Region" and "Multi-Cloud" Clusters?
The introduction of multi-cloud capabilities in Atlas changes how Atlas defines geographies for a cluster. Now, when referencing a multi-region cluster, this can be a cluster that is hosted in:
- more than one region within one cloud provider, or
- more than one cloud provider. (A cluster that spans more than one cloud spans more than one region by design.)
- multiple regions across multiple cloud providers.
As each cloud provider has its own set of regions, multi-cloud clusters are also multi-region clusters.
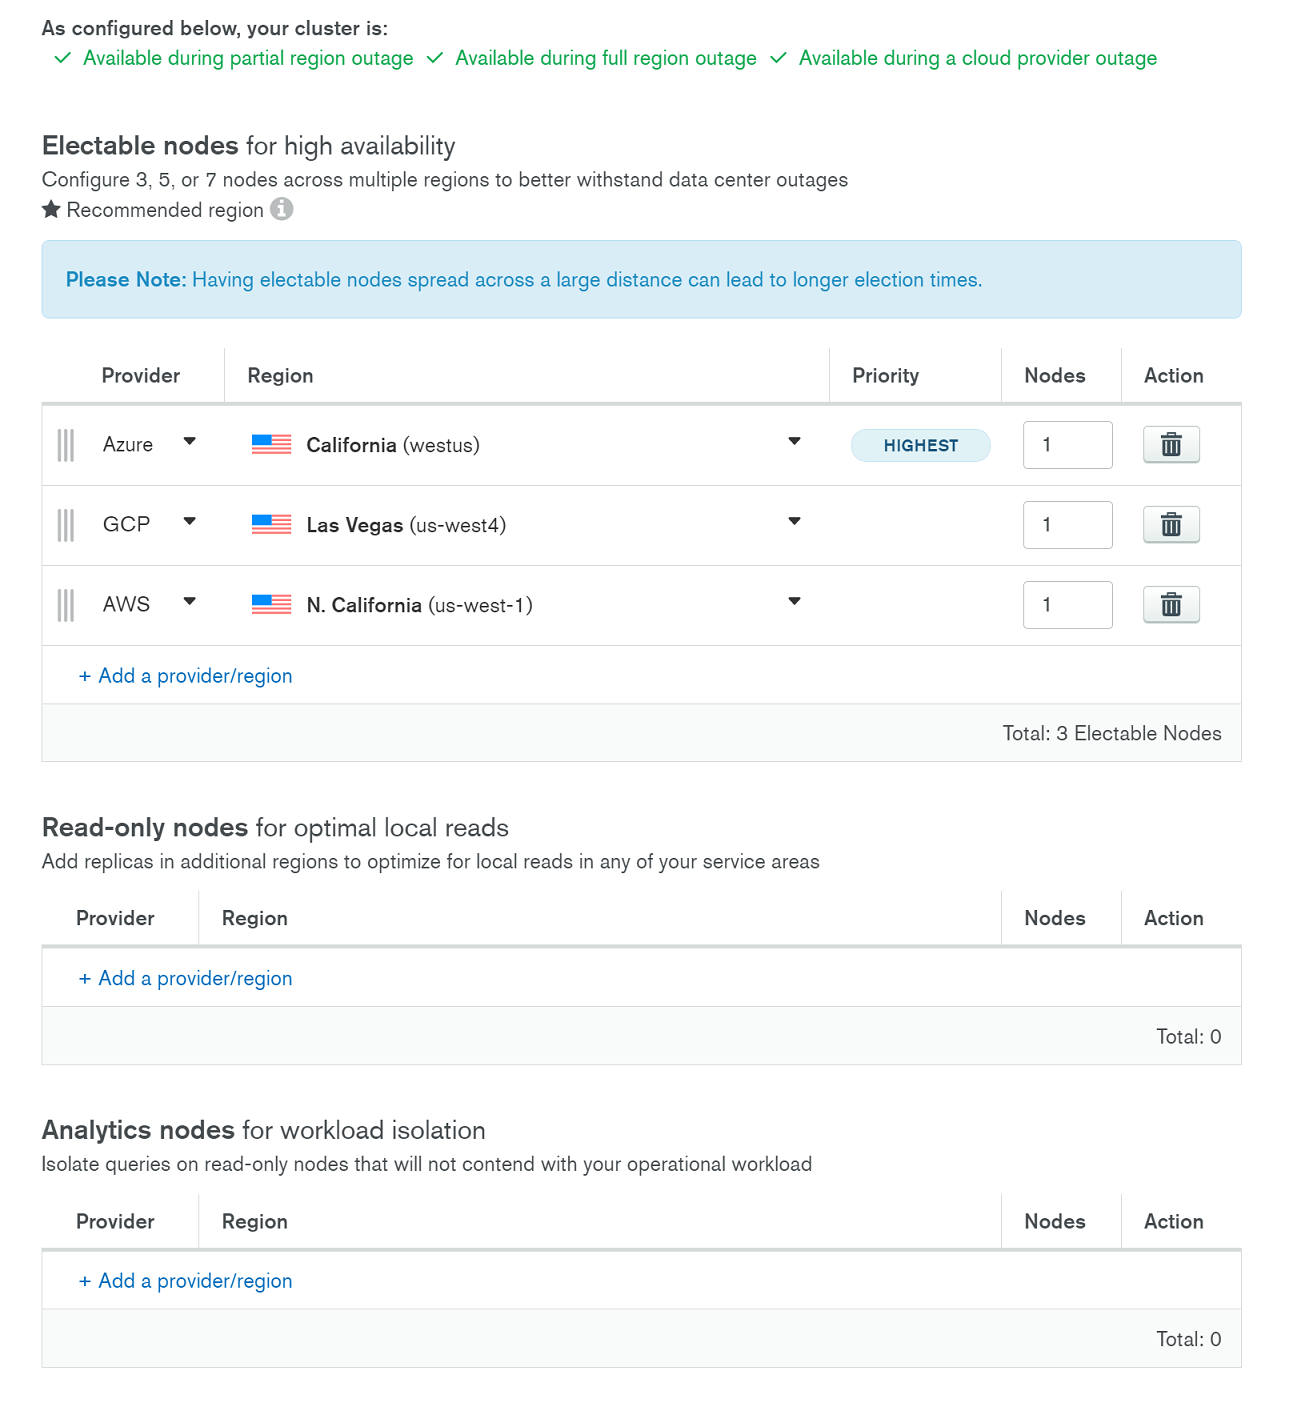
7 . Configure your cluster. In this step, you'll choose a combination of Electable, Read-Only, and Analytics nodes that will make up your cluster.
💡 Choosing Nodes for your Multi-Cloud Cluster
Electable nodes: Additional candidate nodes (via region or cloud provider) and only nodes that can become the primary in case of a failure. Be sure to choose an odd number of total electable nodes (minimum of three); these recommended node distributions are a good place to start.
Read-Only nodes: Great for local reads in specific areas.
Analytics nodes: Great for isolating analytical workloads from your main, operational workloads.
🤔 Still can't make a decision? Check out the detailed differences between Electable, Read-Only, and Analytics nodes for more information!
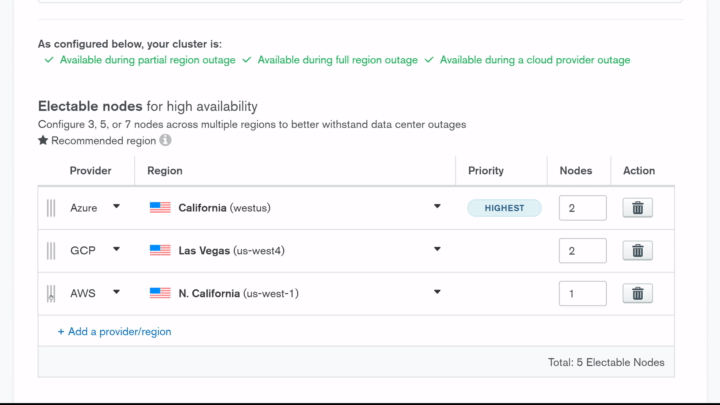
As an example, here's my final configuration (West Coast-based, using a 2-2-1 electable node distribution):
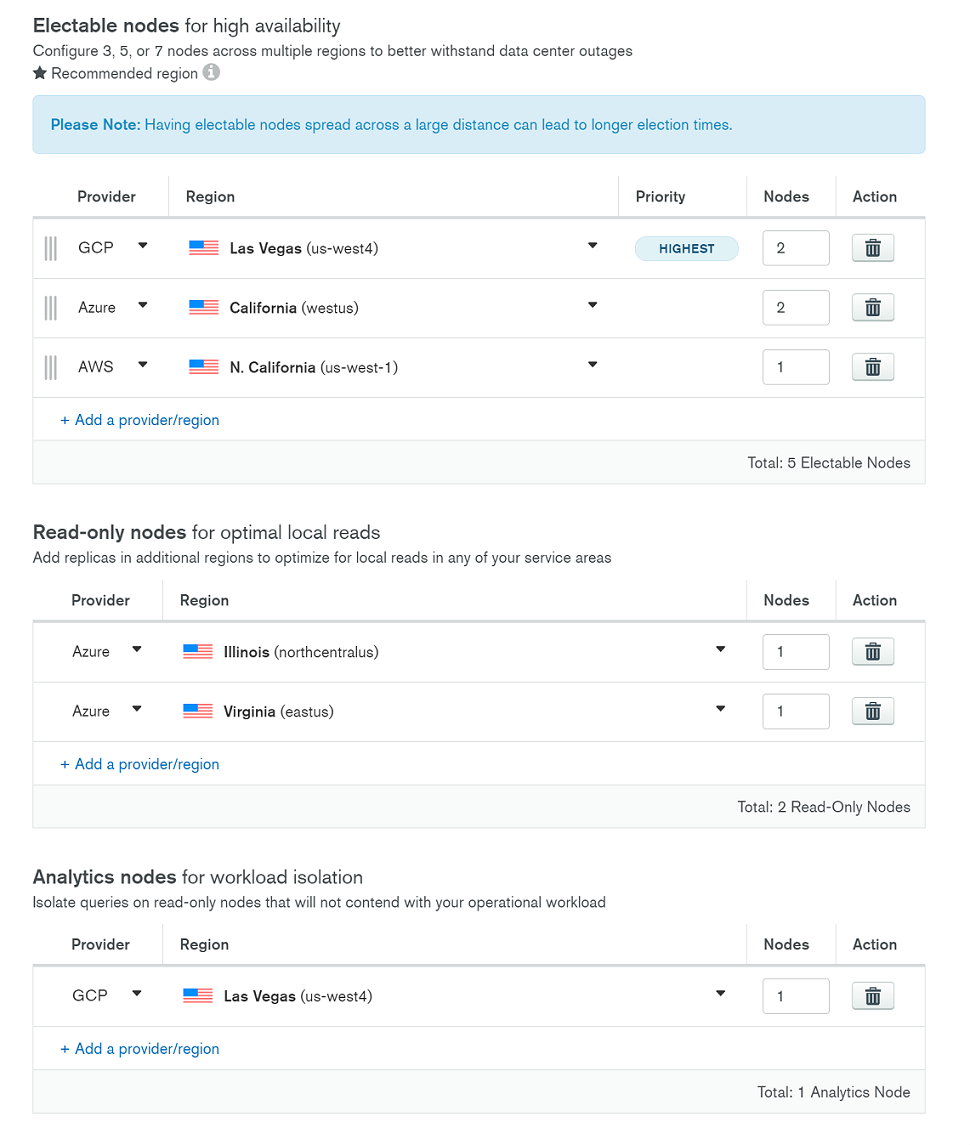
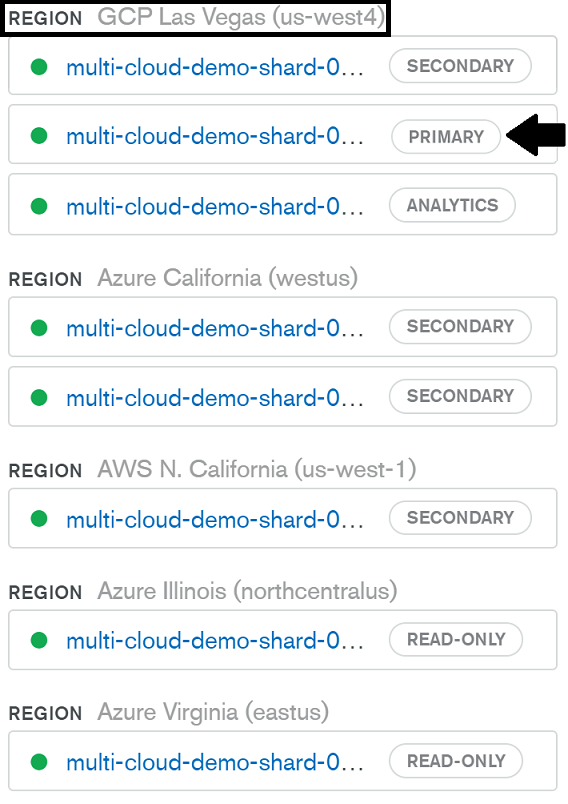
I've set up five electable nodes in regions closest to me, with a GCP Las Vegas region as the highest priority as I'm based in Las Vegas. Since both Azure and AWS offer a California region, the next closest ones available to me, I've chosen them as the next eligible regions. To accommodate my other service areas on the East Coast, I've also configured two read-only nodes: one in Virginia and one in Illinois. Finally, to separate my reporting queries, I've configured a dedicated node as an analytics node. I chose the same GCP Las Vegas region to reduce latency and cost.
8 . Choose the remaining options for your cluster:
- Expand the "Cluster Tier" section and select the "M10" tier (or higher, depending on your needs).
- Expand the "Additional Settings" section and select "MongoDB 4.4," which is the latest version as of this time.
- Expand the "Cluster Name" section and choose a cluster name. This name can't be changed after the cluster is created, so choose wisely!
9 . With all options set, click the "Create Cluster" button. After a short wait, your multi-cloud cluster will be created! When it's ready, click on your cluster name to see an overview of your nodes. Here's what mine looks like:
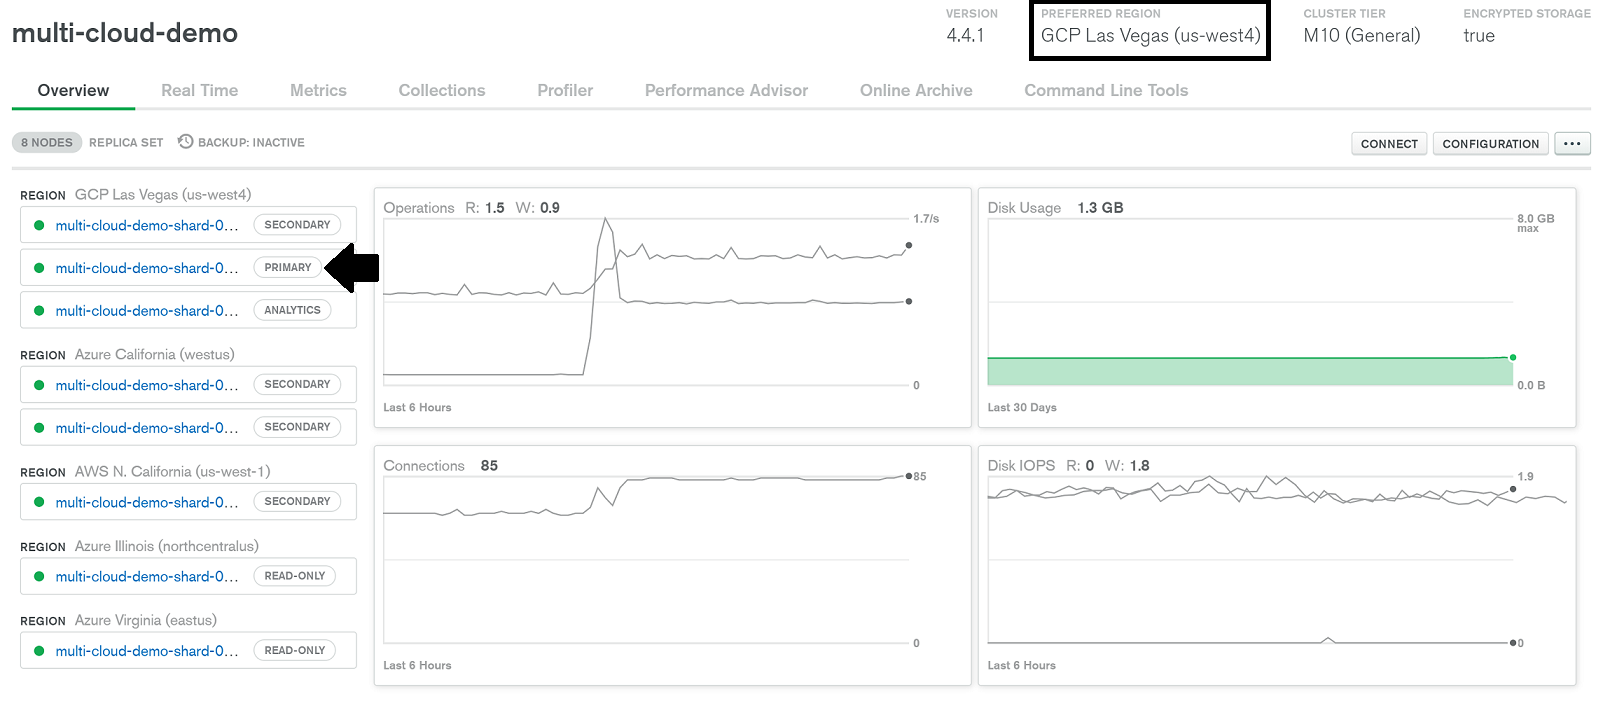
As you can see, the GCP Las Vegas region has been set as my preferred region. Likewise, one of the nodes in that region is set as my primary. And as expected, the read-only and analytics nodes are set to the respective regions I've chosen:
Sweet! You've just set up your own multi-cloud cluster. 🎉 To test it out, you can continue onto the next section where you'll manually trigger an election and see your primary node restored to a different cloud provider!
🌟 You've just set up a multi-cloud cluster! If you've found this tutorial helpful or just want to share your newfound knowledge, consider sending a Tweet!
Testing a Primary Node Failover to a Different Cloud Provider
If you're creating a multi-cloud cluster for higher availability guarantees, you may be wondering how to test that it will actually work if one cloud provider goes down. Atlas offers self-healing clusters, powered by built-in automation tools, to ensure that in the case of a primary node outage, your cluster will still remain online as it elects a new primary node and reboots a new secondary node when possible. To test a primary being moved to a different cloud provider, you can follow these steps to manually trigger an election:
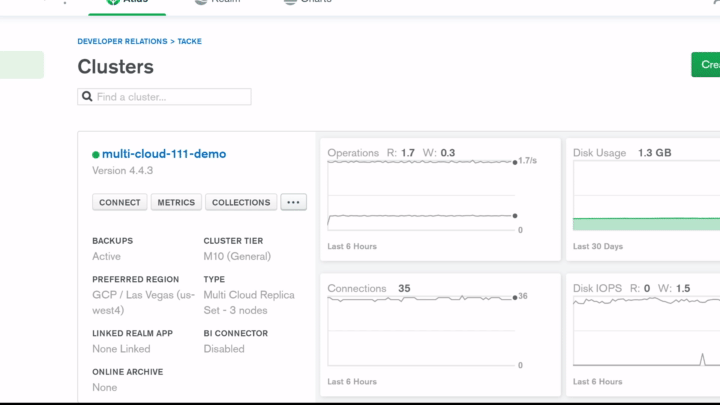
From the main "Clusters" overview in Atlas, find the cluster you'd like to test. Select the three dots (...) to open the cluster's additional options, then click "Edit Configuration":
You'll be brought to a similar configuration screen as when you created your cluster. Expand the "Cloud Provider & Region" section.
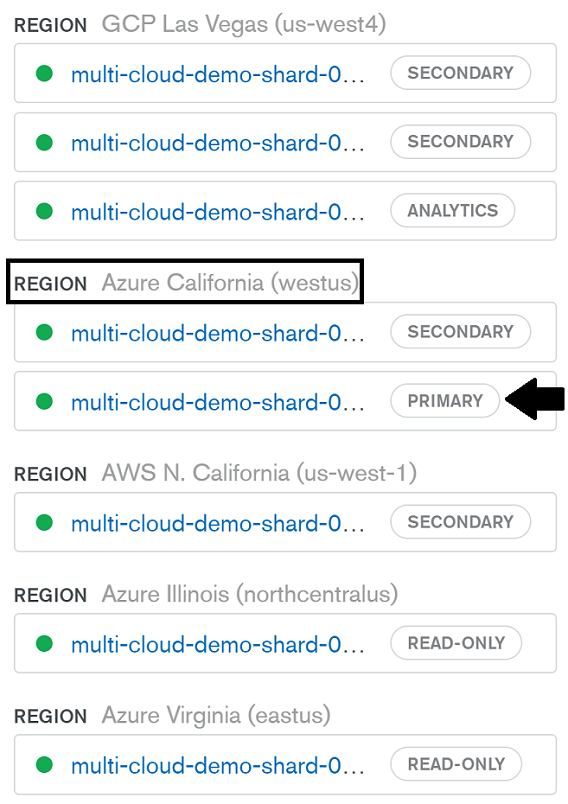
Change your Highest priority region to one of your lower-priority regions. For example, my current highest priority region is GCP Las Vegas (us-west4). To change it, I'll drag my Azure California (westus) region to the top, making it the new highest priority region:

Click the "Review Changes" button. You'll be brought to a summary page where you can double-check the changes you are about to make:
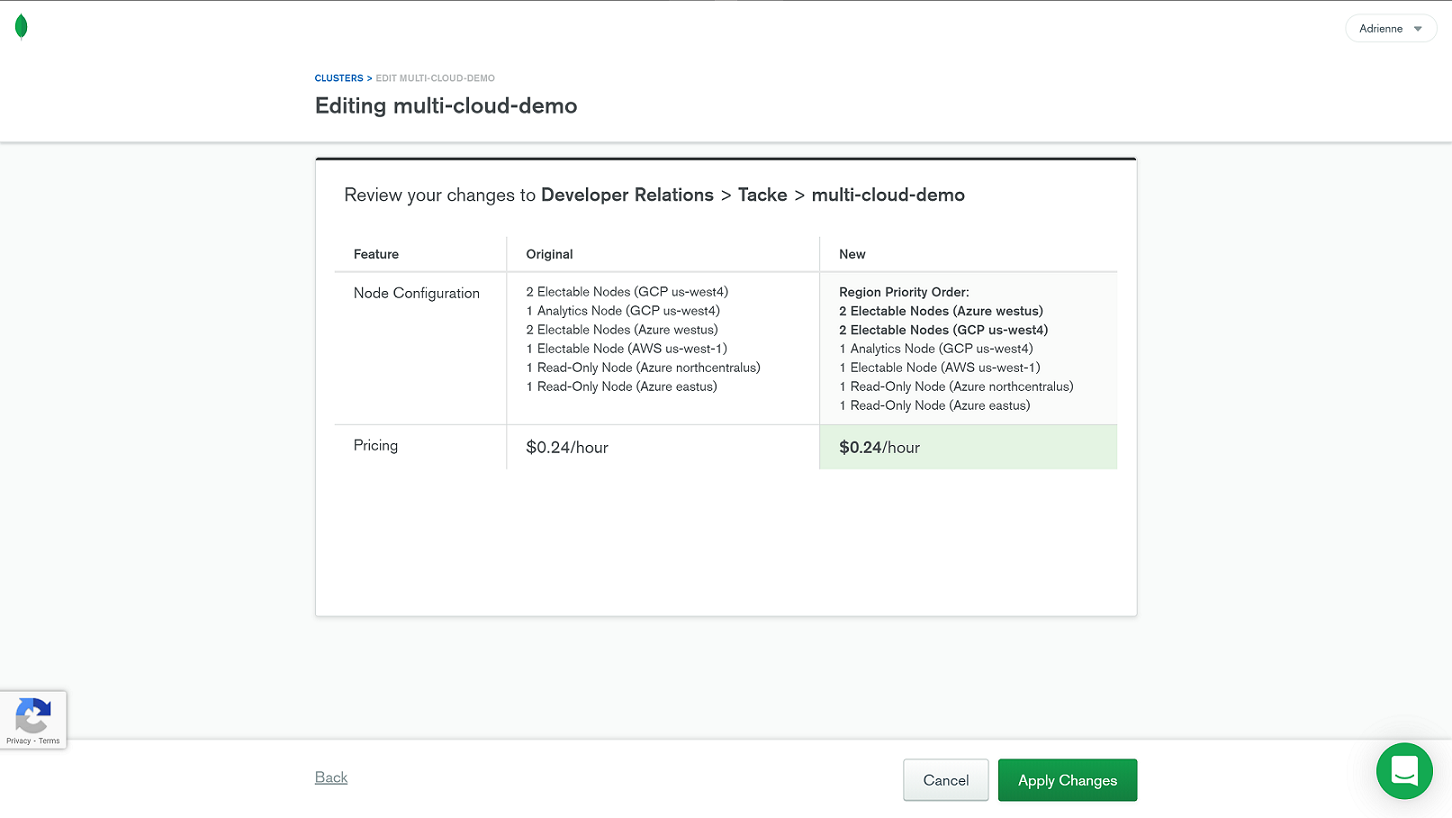
If everything looks good, click the "Apply Changes" button.
After a short wait to deploy these changes, you'll see that your primary has been set to a node from your newly prioritized region and cloud provider. As you can see for my cluster, my primary is now set to a node in my Azure (westus) region:
💡 In the event of an actual outage, Atlas automatically handles this failover and election process for you! These steps are just here so that you can test a failover manually and visually inspect that your primary node has, indeed, been restored on a different cloud provider.
There you have it! You've created a multi-cloud cluster on MongoDB Atlas and have even tested a manual "failover" to a new cloud provider. You can now grab the connection string from your cluster's Connect wizard and use it with your application.
⚡ Make sure you delete your cluster when finished with it to avoid any additional charges you may not want. To delete a cluster, click the three dots (...) on the cluster overview page of the cluster you want to delete, then click Terminate. Similar to GitHub, MongoDB Atlas will ask you to type the name of your cluster to confirm that you want to delete it, including all data that is on the cluster!
Differences between Electable, Read-Only, and Analytics Nodes
Electable Nodes
These nodes fulfill your availability needs by providing additional candidate nodes and/or alternative locations for your primary node. When the primary fails, electable nodes reduce the impact by failing over to an alternative node. And when wider availability is needed for a region, to comply with specific data sovereignty requirements, for example, an electable node from another cloud provider and similar region can help fill in the gap.
💡 When configuring Electable nodes in a multi-cloud cluster, keep the following in mind:
- Electable nodes are the only ones that participate in replica set elections.
- Any Electable node can become the primary while the majority of nodes in a replica set remain available.
- Spreading your Electable nodes across large distances can lead to longer election times.
As you select which cloud providers and regions will host your Electable nodes, also take note of the order you place them in. Atlas prioritizes nodes for primary eligibility based on their order in the Electable nodes table. This means the first row of the Electable nodes table is set as the highest priority region. Atlas lets you know this as you'll see the "HIGHEST" badge listed as the region's priority.
If there are multiple nodes configured for this region, they will also rank higher in primary eligibility over any other regions in the table. The remaining regions (other rows in the Electable nodes table) and their corresponding nodes rank in the order that they appear, with the last row being the lowest priority region.
As an example, take this 2-2-1 node configuration:
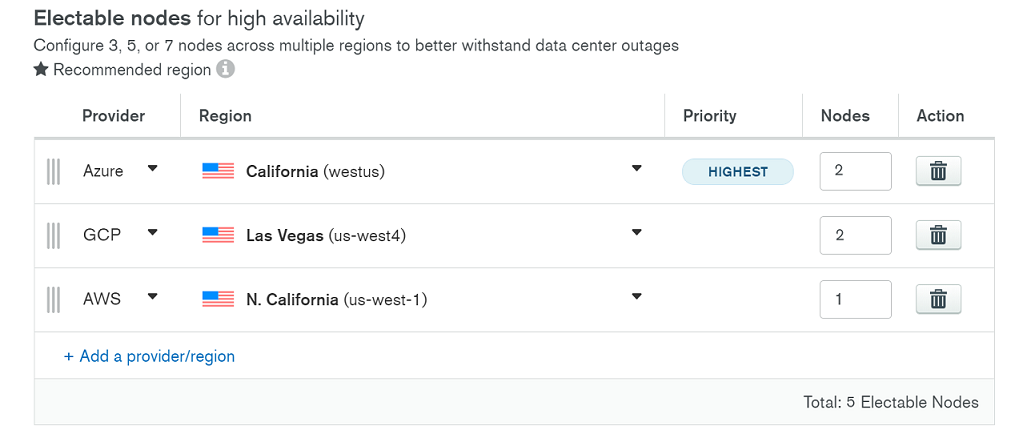
When Atlas prioritizes nodes for primary eligibility, it does so in this order:
Highest Priority => Nodes 1 & 2 in Azure California (westus) region
Next Priority => Nodes 3 & 4 in GCP Las Vegas (us-west4) region
Lowest Priority => Single node in AWS N. California (us-west-1) region
To change the priority order of your Electable nodes, you can grab (click and hold the three vertical lines of the row) the region you'd like to move and drag it to the order you'd prefer.
If you need to change the primary cloud provider for your cluster after its creation, don't worry! You can do so at any time through your Atlas dashboard.
Read-Only Nodes
To optimize local reads in specific areas, use read-only nodes. These nodes have distinct read-preference tags that allow you to direct queries to the regions you specify. So, you could configure a node for each of your serviceable regions, directing your users' queries to the node closest to them. This results in reduced latency for everyone! 🙌
💡 When configuring Read-only nodes in a multi-cloud cluster, keep the following in mind:
- Read-only nodes don't participate in elections.
- Because they don't participate in elections, they don't provide high availability.
- Read-only nodes can't become the primary for their cluster.
To add a Read-only node to your cluster, click "+ Add a provider/region," then select the cloud provider, region, and number of nodes you'd like to add. If you want to remove a Read-only node from your cluster, click the garbage can icon to the right of each row.
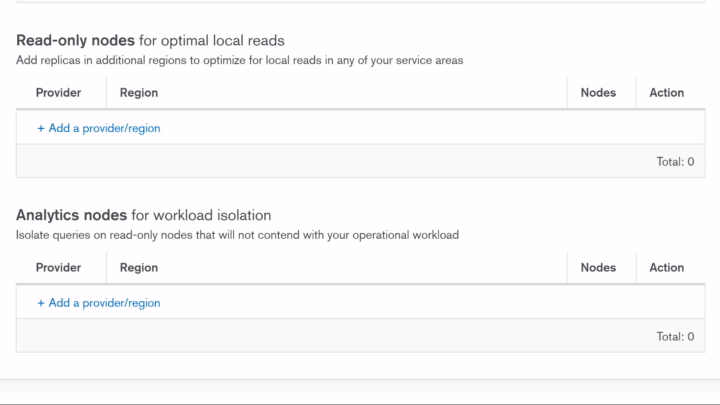
Analytics Nodes
If you need to run analytical workloads and would rather separate those from your main, operational workloads, use Analytics nodes. These nodes are great for complex or long-running operations, like reporting queries and ETL jobs, that can take up a lot of cluster resources and compete with your other traffic. The benefit of analytics nodes is that you can isolate those queries completely.
Analytics nodes have the same considerations as read-only nodes. They can also be added and removed from your cluster in the same way as the other nodes.
Choosing Your Electable Node Distribution
Deploying an odd number of electable nodes ensures reliable elections. With this in mind, we require a minimum of three electable nodes to be configured. Depending on your scenario, these nodes can be divided in several different ways. We generally advise one of the following node distribution options:
2-2-1: Two nodes in the highest-priority cloud region, two nodes in a lower-priority cloud region, one node in a different lower-priority region
To achieve continuous read and write availability across any cloud provider and region outage, a 2-2-1 node distribution is needed. By spreading across multiple cloud providers, you gain higher availability guarantees. However, as 2-2-1 node distributions need to continuously replicate data to five nodes, across different regions and cloud providers, this can be the more costly configuration. If cost is a concern, then the 1-1-1 node distribution can be an effective alternative.
1-1-1: One node in three different cloud regions
In this configuration, you'll be able to achieve similar (but not quite exact) read and write availability to the 2-2-1 distribution with three cloud providers. The biggest difference, however, is that when a cloud provider does go down, you may encounter higher write latency, especially if your writes have to temporarily shift to a region that's farther away.
Multi-Cloud Considerations
With multi-cloud capabilities come new considerations to keep in mind. As you start creating more of your own multi-cloud clusters, be aware of the following:
Election/Replication Lag
The larger the number of regions you have or the longer the physical distances are between your nodes, the longer your election times/replication lag will be. You may have already experienced this if you have multi-region clusters, but it can be exacerbated as nodes are potentially spread farther apart with multi-cloud clusters.
Connection Strings
If you use the standard connection string format, removing an entire region from an existing multi-region cluster may result in a new connection string. Instead, it is strongly recommended that you use the DNS seedlist format to avoid potential service loss for your applications.
Host Names
Atlas does not guarantee that host names remain consistent with respect to node types during topology changes. For example, in my cluster named "multi-cloud-demo", I had an Analytics node named multi-cloud-demo-shard-00-05.opbdn.mongodb.net:27017. When a topology change occurs, such as changing my selected regions or scaling the number of nodes in my cluster, Atlas does not guarantee that the specific host name multi-cloud-demo-shard-00-05.opbdn.mongodb.net:27017 will still refer to an Analytics node.
Built-in Custom Write Concerns
Atlas provides built-in custom write concerns for multi-region clusters. These can help improve data consistency by ensuring operations are propagated to a set number of regions before an operation can succeed.
Custom Write Concerns for Multi-Region Clusters in MongoDB Atlas
| Write Concern | Tags | Description |
twoRegions | {region: 2} | Write operations must be acknowledged by at least two regions in your cluster |
threeRegions | {region: 3} | Write operations must be acknowledged by at least three regions in your cluster |
twoProviders | {provider: 2} | Write operations must be acknowledged by at least two regions in your cluster with distinct cloud providers |
Multi-Cloud FAQs
Can existing clusters be modified to be multi-cloud clusters? Yes. All clusters M10 or higher can be changed to a multi-cloud cluster through the cluster configuration settings in Atlas.
Can I deploy a multi-cloud sharded cluster? Yes. Both multi-cloud replica sets and multi-cloud sharded clusters are available to deploy on Atlas.
Do multi-cloud clusters work the same way on all versions, cluster tiers, and clouds? Yes. Multi-cloud clusters will behave very similarly to single-cloud multi-region clusters, which means it will also be subject to the same constraints.
What happens to the config servers in a multi-cloud sharded cluster? Config servers will behave in the same way they do for existing sharded clusters on MongoDB Atlas today. If a cluster has two electable regions, there will be two config servers in the highest priority region and one config server in the next highest region. If a cluster has three or more electable regions, there will be one config server in each of the three highest priority regions.
Can I use a key management system for encryption at rest with a multi-cloud cluster? Yes. Whichever KMS you prefer (Azure Key Vault, AWS KMS, or Google Cloud KMS) can be used, though only one KMS can be active at a time. Otherwise, key management for encryption at rest works in the same way as it does for single-cloud clusters.
Can I pin data to certain cloud providers for compliance requirements? Yes. With Global Clusters, you can pin data to specific zones or regions to fulfill any data sovereignty requirements you may have.
Thank you!
Thank you so much for taking the time to read through my article. If you enjoyed it or have a question, please let me know in a comment below. Or even better, if you feel this article would be helpful to other devs, please share it/tweet it to spread the knowledge and love. ♥️
For more from me, be sure to follow my blog! And to see what I'm currently up to, follow me on Twitter!